Verified Brand Program
Purpose:
Create a program for food brands to verified their products allergen and facility information for the food allergy consumer to easily find important information when discovering and exploring new products.
Key Features:
- Users will be able to see product images.
- Short description of brand will be displayed.
- Clickable Link to Feature on Spokin, if available.
- Users will be able to recommend brand products
- Users will be able to see Allergen, Facility and Contact Info
- User will be able to see all products and also sort products by category
- Information button will be displayed, when clicked will open up popup modal, describing Verified Brand Program.
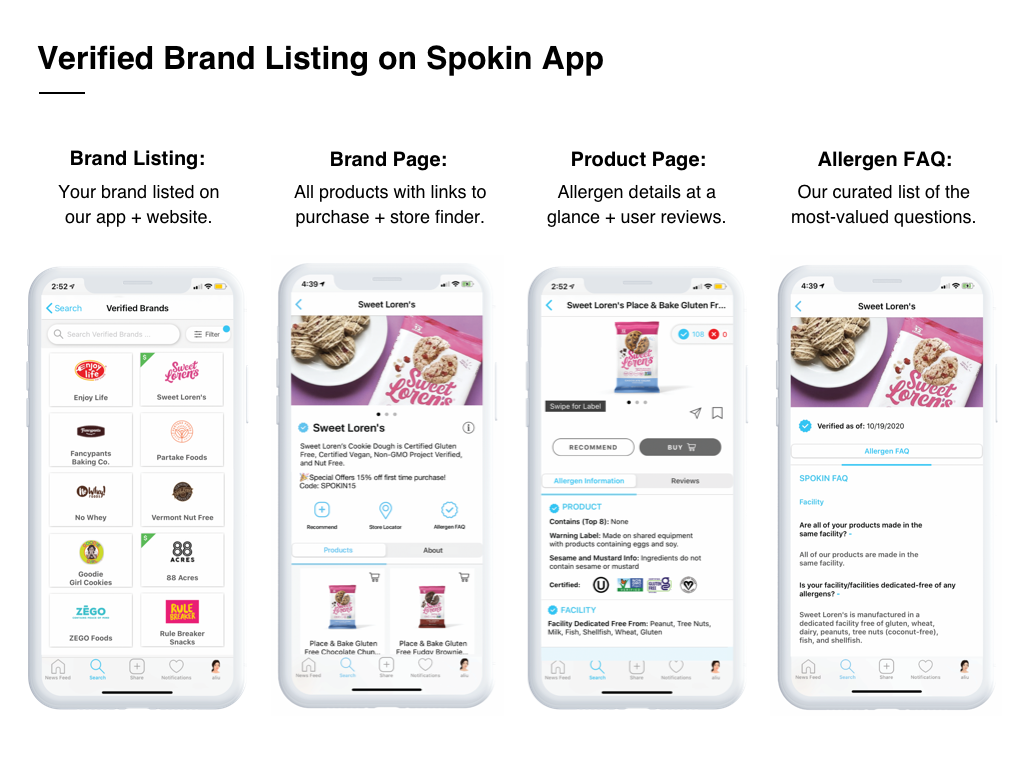
Designs
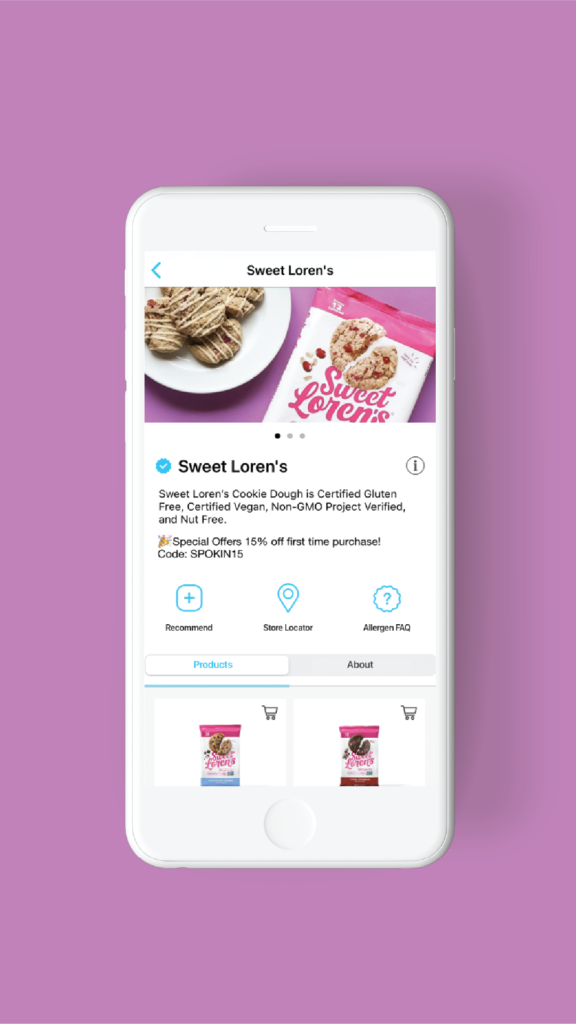
Verified brand listing includes:
1. Brand Listing
2. Brand Page
3. Product Pages
4. Allergen FAQ
QA 1 Checklist: On-boarding Process
1. FAQ
Spokin FAQ Questions: Click Blue +/- Icons to expand/close FAQ answers. Make sure no questions are being cut off. Read FAQ Answers to each question in reference to FAQ Google Form/Spreadsheet to make sure answers are under the correct questions and have no spelling or grammatical errors. Check Off Each Question Below once you verify it as correct. Please make notes next to questions that need changes to later update in Jarvis:
If there are any discrepancies or errors please record in the Brand’s Ticket Spreadsheet
Facility:
- Are all of your products made in the same facility?
- Is your facility/facilities dedicated-free of any allergens?
- How do you ensure foods are free from the food allergens stated on your labels and packaging?
- If any of the top 8 allergens are present in your facility/facilities, what is your protocol to reduce risk of cross-contamination?
Labels:
- If your products include any of the top 8 allergens, where are they displayed on your label?
- Are there additional allergens, outside of the top 8, that you disclose on your label or packaging?
- In what scenarios do you put warning labels on your products?
- Do size variations of your products always contain the same ingredients and warning labels?
Products and Allergens
- Which of the top 8 allergens, if any, are your products free of?
- Are all of your products free of sesame, mustard, or any allergens outside of the top 8?
- Do your products contain peanuts in the ingredients?
- Do your products contain tree nuts in the ingredients?
- Do your products contain milk in the ingredients?
- Do your products contain eggs in the ingredients?
- Do your products contain soy in the ingredients?
- Do your products contain fish in the ingredients?
- Do your products contain shellfish in the ingredients?
- Do your products contain wheat in the ingredients?
- Do your products contain gluten in the ingredients?
- Do your products contain sesame in the ingredients?
- Do your products contain mustard in the ingredients?
Certifications
- Does your facility/facilities have any certifications?
- Brand FAQ links over to the correct page on brand website, if not please update/app the link to their VB Brand Page in Jarvis under the field Brand FAQ Link.
- Is the Brand FAQ consistent with ours? For example: Fronen said they were peanut free, but they added a peanut flavor.
2. Product Pages
Product Information Correct NOTES: We need to clarify that the information inputted on Jarvis (visible on the Spokin App) corresponds correctly to the information confirmed in the Brand’s Product Verification Form.
QUESTIONS TO ASK:
- Is all the information entered?
- Are their empty fields with no answers? Everything should be answered.
- Compared to the Count of Total Products, do we have all products listed?
- Did you ask Miguel to write a script to manually pull all product information from Jarvis, so Jake can add into the product spreadsheet?
IMPORTANT: Check Content for Each Product For each product, check… (Don’t Worry about Buy Link, this is part of QA 3)
- Packaging
- Ingredient Label
- Nutrition Label
- Contains (Top 8)
- Warning Label
- Sesame and Mustard Info
- Certifications
- Manufacturer Declared Free From
- VB categories
- Food Search Categories Notes: [Make notes on the product inventory spreadsheet and make notes where changes/updates are needed. Add any questions or issues to contact brand in the brand ticket spreadsheet]
- Confirm all products have been checked/noted/and updated in spreadsheet and Jarvis
3. Products Consistent with Facility Info
IMPORTANT: Check all products to make sure that the “Manufacturer Declared Free From” sections is consistent with FAQ questions 2 and all product certifications are consistent with FAQ Question 22.
- All products are consistent with Facility Dedicated Free From Information answered in FAQ 2
- All products are consistent with Certification Information answered in FAQ 22
- All products are consistent with Warning Label Information answers in FAQ 7 + 7b
Notes: [Make list of each product and make notes where changes/updates are needed]
4. Products Consistent with Existing Content Information
- If we have any content on their products/brand, Is the product information correct in the content based on the verified information?
- Identify what content the VB is included in.
- Confirm that content information is accurate. Make note of any issues with content in the Brand ticket spreadsheet. Update/Make changes if needed.
5. Email Brand (Follow-up Details)
- Send Verified Badge
- Ask them any necessary questions regarding FAQ/Product discrepancies, etc.
- Ask them if they want early access to view their brand page (need to make account on Spokin) Will need to send their profile ID to miguel so he can grant them access on the app.
- If set, clarify a launch date and ask if they have time for a phone call to discuss social launch.
QA 2 Checklist: Verified Brand Functionality
If there are any discrepancies, issues with app functionality, please record in the Brand’s Ticket Spreadsheet.
1. Search
A. Main Search Bar: Type Brand Name into search bar
- Verified Brand Page with Blue checkmark is the top search results
- Click on search result – brings you to the Verified Brand Page
- Verified Brand Products are easily found in search results
- Click on search result – brings you to the Verified Product Page
- Count the number of Verified Brand Products in the search results.
- Confirmed: The count in search = count on brand page
- Are there more products found in search results than identified on the Brand Page? Do some products link over to normal product pages? More or less products found in search result, Issue of duplicate product pages or missing pages. Please make note of any duplicate product pages below… Notes: [insert notes]
B. Food Product Search: Click on Food in explore topic section
- Search Brand Name in Food Search Bar. Do all the products populate in the search results?
- Are we using the correct category tags? Refer to the Category Tags listed on the product inventory spreadsheet…this will determine product categories where products should be found.
- Brand Product Image is displayed in the category carousel? If not, give a suggestion where it should be located. VB’s already representing their categories.
- Check that all brand products found in the food search have a verified blue checkmark.
- Brand Products are correctly tagged and found in the correct categories. Can’t find products in any categories? Make note to update category information in Jarvis on the brand’s product pages. Notes: [insert notes]
C. Click Verified Brands in explore topic section
- Brand Card is visible in the list of all brands
- Search Brand name in Verified Brand’s search bar. Press enter/search to populate. Brand card is visible in search results.
- Is the Brand Logo legible?
- Click Brand Card, brings you to correct Brand Page Notes: [insert notes]
2. Brand Page
A. Brand Page (Header and Description)
- Hero Image is correct/good quality
- Can scroll between hero images
- Brand Name is spelled correctly
- Brand Description is correct without any spelling or grammatical errors
- Click on the circle with i (tooltip) and Verified Brands pop-up description comes up Notes: [insert notes]
B. Recommendation Button*
- Click Recommend Button – Select Product Page comes up…
- Test Search functionality
- Scroll to make sure all Products are visible on the page (Products you have already recommended will be invisible here)
- Select ALL PRODUCTS to check all product boxes
- Deselect ALL PRODUCTS to uncheck all product boxes
- Select a product and click next. Run through the entire recommendation flow Notes: [insert notes]
C. Product Cards/Categories
- Brands with 10 or less skews/products should have NO categories
- In reference to the brand’s product spreadsheet and latest product verification form, all products all visible on the brand page.
- All Product Images are displaying
- Categories Images are correct
- Click Category cards. Does each category section pull in the correct products?
- All variety packs are ordered at the bottom of the product display
- Does the product display/order look nice? Should we re-order the display of products? Create list order in Product List Spreadsheet to update on Jarvis later.
- Product Title/Descriptions are consistent and can read. Products do not display Brand Name, only show products title. Titles with go to two lines.
D. Allergen Info Button
- Click Allergen Info Button with Blue Checkmark – Allergen FAQ and Contact Tabs comes up…
- Brand Logo is the Hero Image. Logo looks adequate and readable.
- Below logo is the VB Blue Checkmark with the date of the Brands latest Verification Notes: [insert notes]
3. Contact Info
A. Click on the Contact Tab – Test all links on the contact page
- Website Link
- Phone Number (prompts you to call)
- Email (prompts you to email draft)
- Social Buttons link over to correct accounts Notes: [insert notes]
4. Product Pages
A. Product Page Functionality Click on All Product Cards in the Brand Page
- All Products link to their corresponding product page
- All Shopping Cart Icons link over to the Buy Link
- All Product Pages Display Allergen Info and Review Tabs (Some Product may have zero reviews)
- All Products can be recommended. Click on the recommend button.
- All Products can be shared within the Spokin App. Click on the share icon (arrow)
- All Products can be saved within the Spokin App. Click on the Save Icon (ribbon next to arrow)
- All Products are being correctly red flagged by allergen
5. Consolidating Duplicate Product Pages
IMPORTANT: Make note of any duplicate product pages below. We will need to consolidate all duplicate pages into one verified brand product page. From your findings above in search you’ll be able to identify any duplicates. Can confirm by searching product name in Jarvis web browser.
- List all duplicate product pages below. (Will reconcile in QA3)
6. QA 1 Reconciliation
Product Page Updates from QA1: List all Jarvis changes/updates needed to be made from QA1 notes. (Initial each action item and mark with DONE when completed) 1. 2. 3. etc…
- CONFIRM ALL CHANGES HAVE BEEN MADE IN JARVIS
- CONFIRM ALL CHANGES ARE VISIBLE IN APP PRODUCT PAGES
FAQ Updates from QA1: List all Jarvis changes/updates needed to be made from QA1 notes. (Initial each action item and mark with DONE when completed) 1. 2. 3. etc…
- CONFIRM ALL CHANGES HAVE BEEN MADE IN JARVIS
- CONFIRM ALL CHANGES ARE VISIBLE IN APP ON FAQ PAGE
QA 3 Checklist: Buy Links and Jarvis Reconciliation
Brand Name: (enter Brand Name)
- QA Reviewer 1: (Initial and date)
1. QA2 Reconciliation:
A. Visual Updates/Changes from QA2: List all Jarvis changes/updates needed to be made from QA2 notes. For example, updating Hero Images/Logos/Category Images, Category tagging, Spelling or Grammatical Errors. (Initial each action item and mark with DONE when completed) 1. 2. 3. etc…
- CONFIRM ALL CHANGES HAVE BEEN MADE IN JARVIS
- CONFIRM ALL CHANGES ARE VISIBLE/CORRECT IN APP
B. Consolidate Duplicate Product Pages from QA2: List all Jarvis/JMO changes/updates needed to be made from QA2 notes. (Initial each action item and mark with DONE when completed)
- CONFIRM ALL DUPLICATES HAVE BEEN CONSOLIDATED IN JMO
- CONFIRM ALL CHANGES ARE VISIBLE/CORRECT IN APP
2. Link Selection
Buy Button on Product Pages: (View existing buy links in Product Inventory Spreadsheet under the Buy Link Column)
A. Hierarchy of Link Selection:
- Amazon Product Page from Vendor Account (Get referral link with correct brand tracking ID selected)
- Individual Product Page from Brand’s Website (Driving traffic directly to the brands website)
- Amazon Product Page from Third Party Seller Account (Get referral link with correct brand tracking ID selected)
- Individual Product Page from Third Party Website (Last case scenario)
B. Contingencies:
- Is the Product reasonably priced?
- Is it the correct size variation?
- Does it have the correct packaging?
- Think of consumer’s experience
C. How to Create Amazon Referral Links
- Sign into our Amazon Associates account
- Go to Tools > SiteStripe > Learn More (under paragraph text) > Toggle on Display Status Enabled > Check both Get Link and Share boxes.
- Go to the desired Amazon Product Page, the SiteStripe Toolbar will be located at the top of your browser.
- On the toolbar, click Get Link: Text. Choose the correct Tracking ID tag associated under the Store ID: Spokinvb-20.
- Copy and Paste the Short Link Provided into the Jarvis product page.
3. QA3 Reconciliation:
A. Double Check All Links: Make all link changes in Jarvis and Product Inventory Spreadsheet under ‘Buy Link’ column.
- CONFIRM ALL LINK HAVE BEEN CHANGED IN JARVIS
- CONFIRM ALL LINK HAVE BEEN CHANGED IN THE PRODUCT INVENTORY SPREADSHEET
- CONFIRM ALL LINKS WORK IN APP
Launch Verified Brand
After QA has passed, set the brand page as approved to set live on production. Get ready for to create launch assets for social campaign.

Verified Brand Filter
Give users the ability to filter/search through our verified brand partners based on food, bakeries, and healthcare.
Key Features:
- Primary Filters – Food+Dining Out, Healthcare
- Secondary Filters – based on primary category selection
- Dynamically pulls a preview of total results based on filter selections
Primary Categories – Initial Filter Screen
- Sort by Alphabetical (A to Z)
- Food + Dining Out:
- Food
- Bakeries
- Healthcare
- Preventatives
- Devices
- Testing
Sub Categories – Based on Primary Category Selection
- Food:
- Sort by: Alphabetical (A to Z)
- Categories: Snacks, Candy, Frozen, etc. (Will show top three options + show more button to expand)
- Dedicated Facility: Top 8 and more, Peanut, Tree Nuts (Will display these options + show more button to expand)
- Certifications: The top three will display (show more button to expand certification options)
- Bakeries:
- Sort by: Alphabetical (A to Z), Online Shipping Available
- Location: Top 3 locations will display (show more button to expand location options)
- Dedicated Free From: Top 3 options will display (show more button to expand dedicated free options)
- Healthcare (Preventatives, Devices, Testing):
- No subcategories needed for healthcare options.
- Once a user selects one of the healthcare categories they can hit see results to see the filtered tiles.
Functionality
Filter Selecting:
- Only ONE of the Primary Categories on the initial filter screen can be selected.
- Subcategories: A user can select multiple subcategories and options within those subcategories. For example:
- Food > Sort By > Categories (only ONE categories can be selected) > Dedicated Facility (Multiple Allergens can be selected) > Certifications (Multiple certifications can be selected)
- Bakeries > Sort By > Location (only ONE can be selected) > Dedicated Free From (Multiple Allergens can be selected)
Filter Deselecting:
- If a user at any point in the filter flow clicks “Reset” it will bring them back to the initial filter screen (VB Filter 0) with nothing selected.
- If a user at any point in the filter flow deselects a primary category (food, bakeries, etc.) it will bring them back to the initial filter screen (VB Filter 0) with nothing selected.
- If a user deselects a subcategory (Location or Dedicated Facility option) it will deselect that filter option and keep them on the same screen.
Food Filter – User Flow
Bakeries Filter – User Flow
Design Notes:
- VB Filter 0: Will be the initial screen (primary categories) when I user selects the filter button.
- If a user selects a category under Food + Dining Out (Food or Bakeries) Their selection will animate to the top of the screen and the subcategories will appear below. See screen VB Filter 2 for reference.
- All primary categories, and sub category titles should be bolded.
- When a filter is active (see results selected), the filter button will have a blue circle on the upper right hand corner of the button
- Each subcategory section will display 3 results with a “show more” button to expand and a “show less” button to collapse
- The dynamic number pulled based on filter selections will be displayed in the blue “see (#) results” button
Metrics to Track:
JMO Tracking VB Filter Queries: (Total Number and % of Total)
- Whenever a user clicks: See Results and “Food” is a selected filter.
- Whenever a user clicks: See Results and “Bakeries” is a selected filter.
- Whenever a user clicks: See Results and “Preventatives” is a selected filter.
- Whenever a user clicks: See Results and “Devices” is a selected filter.
- Whenever a user clicks: See Results and “Testing” is a selected filter.